Skip to content
Ranchers Fencing & LandscapingRanchers Fencing & Landscaping
Ranchers Fencing & Landscaping

Ask About Our
Fence Warranty

FREE Quote Today!
512-673-8768
  • Home
  • Lawn Care Services
    • Lawn & Landscape Maintenance Services
    • Lawn Aeration Services
    • Fertilization & Weed Control
    • Tree & Lawn Pest Control
  • Landscaping Services
    • Irrigation Installation & Maintenance
    • Sod & Mulch Installation
    • Spring & Fall Landscape Cleanups
    • Tree Care & Removal
  • Fence Services
    • Residential Fences
    • Commercial Fences
    • Types of Fences
    • Wood Privacy Fences
    • Fence Repair
    • Fence Installation
    • Gate Installation
  • About
    • About Us
    • Reviews
    • Our Projects
    • Blog
  • Contact
    • Contact Us
    • Make A Payment

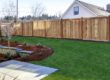
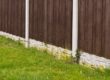
Best Practices for Painting a Wooden Fence

Painting a wooden fence

Painting your wood fence is easy with the right knowledge and equipment. Follow the steps below for a professional finish.

1. Choose the Right Paint

Before painting your fence, you first need to know what type of paint to use on your wood fence. Fence paint comes in a variety of types, colors, and finishes. Be sure to choose a paint that’s suitable for wood fences and designed to withstand the elements.

2. Prepare the Area Around Your Fence

Prepare the area around your fence by removing any plants or furniture to a safe location. Trim back any overhanging foliage and pin back any climbing plants that you can’t cover or don’t want to cut back, using plant canes and ties. You should also cover any concrete posts and put dust sheets over nearby surfaces to protect against paint splatter.
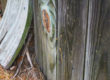
3. Clean Off Dirt

Clean your fence using a wire brush and a multi-purpose outdoor detergent. Treat any areas of mold or algae with a fungicidal wash.

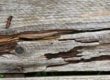
4. Repair Any Damage

Inspect your fence and repair or replace any damaged sections of wood. For minor repairs, apply exterior wood filler and allow sufficient drying time before sanding it flush with your fence.

5. Sand Away Flaky Areas

If your fence has previously been painted, use medium-grade sandpaper to sand down any flaky areas for better paint adhesion. For larger areas, consider using an electric power sander. After sanding, remove any residue with a clean rag.

6. Prime Before Painting

Seal and prime your fence with an exterior wood primer that’s appropriate for the paint you’re planning to use. If your fence has previously been painted, pay particular attention to priming areas where the paint has peeled or worn thin.
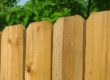
7. Paint Your Fence

Paint your fence on a warm, dry day with no rain or wind in the forecast. Make sure your fence is completely dry before painting.

If using a brush or roller, the best way to paint your wood fence is to apply a thick, even coat of paint along the grain. Be sure to brush out any drips or runs before they begin to dry.

If using a paint sprayer, hold the nozzle about 15 cm from the fence and move along the full width of the fence using long, sweeping motions. Drop down and repeat the process, overlapping each pass by 50 percent, until you’ve covered the whole fence. Allow the paint to dry as per the manufacturer’s instructions. Then apply a second coat, if required.

By following these steps, you can paint your fence like a professional and keep your fence looking good for longer. To get the most out of your fence, contact Rancher’s Fencing today.

Category: MaintenanceBy Ranchers Fencing and LandscapingNovember 17, 2016

Post navigation

PreviousPrevious post:Fixing Damage Done to Your FenceNextNext post:Best Types of Fences for Pets

Related posts

What causes your fence to sag and lean?
November 17, 2017
Sealing can also help prevent splitting
Extending The Life of Your Fence
November 11, 2017
austin yard in summer
Best Ways To Care For Your Yard In Summer
June 23, 2017
wooden fence
How To Maintain a Wooden Fence
May 19, 2017
wood fence planks
What insects do the most damage to wood fences?
March 7, 2017
grass along fence
How to Cut Grass Around Your Fence Without Damaging It
January 19, 2017

FREE Quote

Contact Us Today
  • This field is for validation purposes and should be left unchanged.
Rancher's Fencing 2015 Angie's List Award Rancher's Fencing 2015 Angie's List Award Rancher's Fencing 2014 Angie's List Award
Recent Posts
  • A Guide to Summer Lawn Care in Austin, TX
  • How to Lay Sod in the Fall like a Pro
  • The Benefits of Xeriscaping
  • Why You Should Leave Fence Repair to the Experts
  • Building a fence for your garden
Navigation
  • Home
  • About Us
  • Fence Repair in Austin, TX
  • Types of Fences
  • Warranty
  • Blog
Contact Us
Ranchers Fencing & Landscaping
PO Box 2238
Pflugerville, TX 78660-2238
Phone: 512-673-8768

Get Your Free Quote


Find us on:

FacebookTwitterGoogle+
Recent Posts
  • A Guide to Summer Lawn Care in Austin, TX
  • How to Lay Sod in the Fall like a Pro
  • The Benefits of Xeriscaping
  • Why You Should Leave Fence Repair to the Experts
Our Service Areas
Austin,Buda, Georgetown, Lakeway,Leander, Pflugerville,Round Rock
Copyright © 2019 Ranchers Fencing & Landscaping | Privacy Policy | Google +